This article is an excerpt from NauticEd’s online Skipper Large Keelboats Course, a comprehensive online sailing course for beginner to intermediate sailors to learn how to sail large sailboats 26 ft (8m) and above. The Skipper Large Keelboats course is part of the Skipper Course Bundle of online courses, also teaching you how to master maneuvering under power and docking!
You can learn to sail and improve your sailing with NauticEd, the international leader in sailing education.
Sailboat Running Rigging
A sailboat’s running rigging consists of those items controlling the sails and helping the sails to capture the wind’s energy.
Here you find a fascinating array of hardware, all with specialized functions and unique names. Most tend to be quite expensive. They are expensive because they must be uniquely designed and made of reliable materials that will not fail under stress.
The main running rigging names you should know are shown below. Test yourself to learn and know each name by tapping the associated letter.
Running Rigging Terms Animation
- The main halyard is used to hoist the mainsail up the mast.
- The cunningham is used to provide downhaul tension on the sail. It usually has multiple blocks so that extra tension can be applied over the ability of the main halyard.
- The boom vang controls the downward tension on the boom, which acts to flatten the sail.
- The mainsheet allows the boom to swing out to capture the wind at various boat angles to the wind.
- The reefing lines allow the sail to lower a little, which decreases the area size of the sail.
- The boom topping lift holds the boom up when the mainsail is not up. Care must be taken to not allow the boom topping lift tension to act against the main sheet or boom vang. Under sailing conditions, the boom-topping lift should be slack.
If you are lucky, most of the rigging lines run back to the cockpit for easy access.
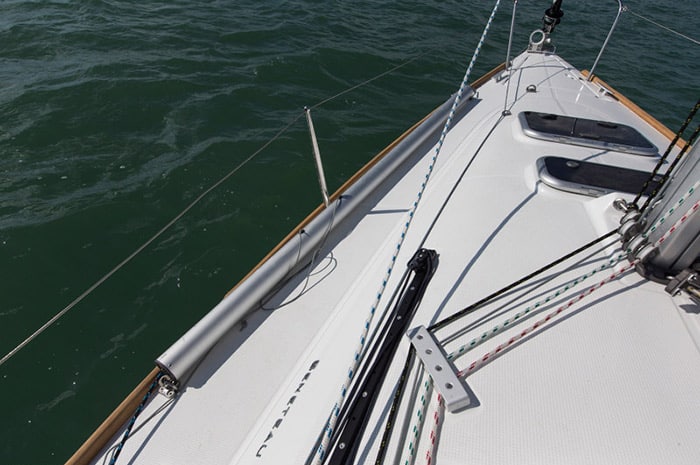
The Boom
The boom is a horizontal pole (spar) attached to the mast and capable of swiveling. In addition to holding the sail out in its classic triangular shape, the boom also provides a means for multiple controls of the mainsail. The sail’s leech (trailing edge) can be tightened by tightening the main sheet. Letting out the mainsheet allows the boom to rise and swing-out. The traveler can pull the boom to windward without changing the shape of the sail. The boom vang pulls down on the boom, which can flatten the sail. The outhaul flattens the foot of the sail.
You’ll find a more in-depth discussion on controlling the sails in Chapter 7. (Also see the NauticEd Sail Trim Clinic for a very technical lesson.)
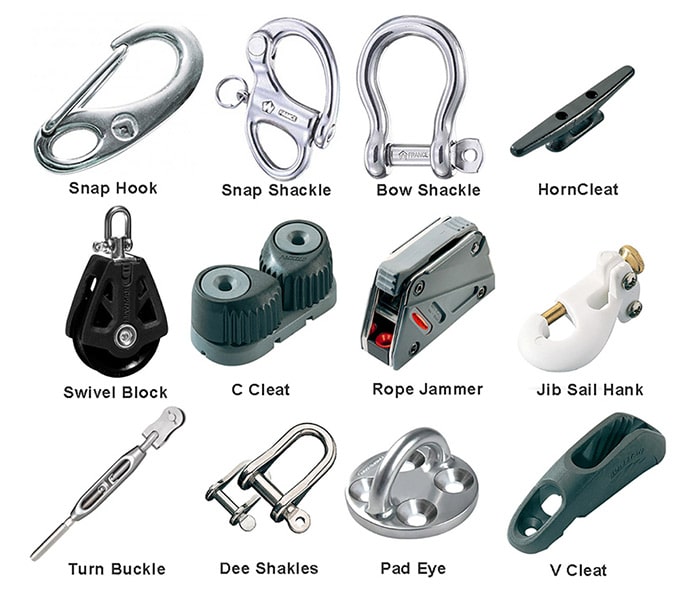
Hardware
A few words about the plethora of running rigging hardware commonly found on sailboats. They are made from a wide variety of materials, each with its own set of characteristics and problems. Stainless steel is good-looking and resistant to corrosion but expensive and it will in fact corrode in the presence of oxygen and chlorine in ocean water (from the salt NaCl). Thus freshwater washdown is prudent.
Plastic materials have a tendency to dry out and become subject to cracking. Some sail materials will often be degraded by sunlight. Hulls may blister. Corrosion is ever-present. And so on…
The bottom line is that all the materials on a sailboat have limitations. While in general problems are infrequent, the sailboat materials, like sailors, do occasionally exhibit a weakness.
There are many items that need periodic replacement or can be easily lost. Every vessel should have an adequate store of spare items. Be careful not to buy cheap replacements. Cheap ends up being expensive.
Hardware
Department of Redundancy DepartmentAs a guest on a Mediterranean sail between Cannes and Corsica, I asked the captain why he seemed to have replacements for every part of the boat stored somewhere down below. The Captain said merely, “Experience, boy. Experience.” He’d sailed the boat around the world for over four years. |
Winches
Using a winch is fundamental to most of us but the first time you see one it may not be obvious. You use a winch to wind in the sheets (lines-ropes) nice and tight. It provides hundreds of times the mechanical advantage over what you could apply with your hands and it will hold the sheet long after you get tired.
The essence of the winch is the number of wraps of the line around the winch cylinder. The winch cylinder is knurled with a rough surface to help prevent the line from sliding back around. The wrap provides back-tension in the form of friction from the winch cylinder on the line. The more wraps the more friction and thus back-tension. A line with a thousand pounds of force from the sail can be held with only a few pounds of pull by your hand when there are 3-4 wraps around the winch. But when pulling in by hand you don’t gain the mechanical advantage. Thus, to pull in the line, you must turn the winch using the winch handle. The mechanical advantage to pull in the line is gained by the gearing inside the winch. The person winding the winch is usually backed up by another person “tailing” the line as it comes off the winch. The tailer must keep tension on the line. If they cannot provide enough tension to keep the line from slipping in the winch then you should put another wrap around the winch. In light winds usually, 2 wraps are fine. In higher winds add 1 or 2 more. After the line is wound in, the line is either held by hand for constant trimming purposes or set into a cleat.
Self-tailing winches have a slot around the top. A self-tailing winch does not require anyone to pull on the sheet as it comes out of the winch. The slot automatically clamps the sheet in so it cannot pull out backward. You’ll need to notice the stainless steel tab that drops down over the slot. Use this tab to bring the sheet up into the top slot. Many people make the mistake of just winding the sheet up into the slot without the tab. This will cause the sheet to undo. Use the tab! Self-tailing winches also have the advantage that the cleat for holding the line after it is wound in is built into the winch.
Many winches go in both directions; one for faster winding in and the other direction for slower winding. The slower direction applies more mechanical advantage. So use the fast direction until it gets too tough, then switch to the other direction to wind in the last bit.
Here are the quick secrets:
- No matter what you think, you always wrap the sheet (line/rope) around the winch in a clockwise direction (even in the southern hemisphere).
- The more times you wrap the sheet around the winch, the more friction is applied and the more pulling power you can apply.
- If the sheet is not moving as you turn the winch, wrap it around the winch one more time.
- Usually, most winches are limited to about 4 wraps.
- Under most circumstances, 2 wraps will do.
- If the wind gets above 12 knots, you’ll need 3 wraps.
- Use the tab to get the sheet up into the top slot.
- Keep your fingers clear.
The animation shows the line being wrapped clockwise around the winch and then up onto the tab and into the self-tailing slot.
Winch Use Animation
Locking Cleats
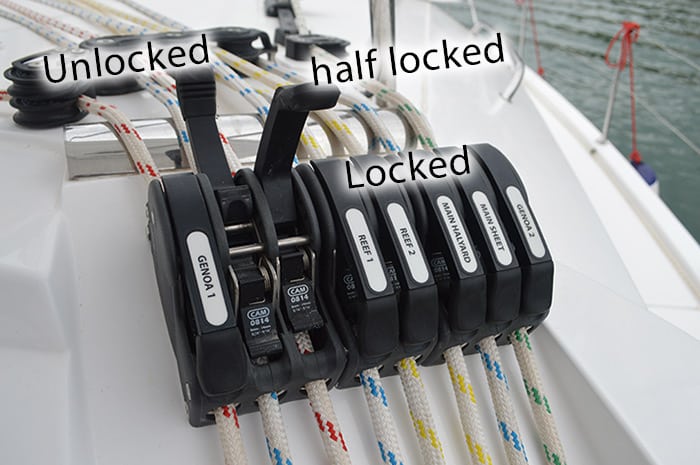
Locking Cleats
Locking cleats are simple. They simply lock the line from moving back out once you’ve pulled it in. The trick to unlocking the cleat is simple: the lever has to be ALL THE WAY BACK, not halfway up. An important safety item: NEVER JUST FLICK OPEN THE LEVER. If there is tension on the line, you or the person holding the line will experience a rope burn, which is not a pleasant thing. We all learned this as a child. ALWAYS wind the line around the winch at least two times and cleat it, then flick the lever all the way open, now slowly release the tension on the line. Once the tension is gone, you can remove the line from around the winch.
Watch this video on how to manage the winch handle. Admittedly – maybe I was a bit grumpy that day!
Sailing Tip
Lines and Knots
Sailboats seem to be awash in “ropes,” which are properly called lines by sailors. These lines come in a wide range of materials from some that stretch easily (nylon) to others that are less elastic.
Selecting lines is not simply a matter of what color or thickness you like; these lines serve specific purposes calling for unique characteristics.
Here is a partial list of common lines and their functions.
- Halyards—Used to raise and lower sails
- Sheets—Used to control the set of the sail
- Furling lines—Used to furl main and head sails
Some lines might pass through various blocks (pulleys) and adjusting devices, like travelers, and some may end up being controlled by winches. Lines that are subject to abrasion should regularly be inspected and replaced if it appears they have been compromised.
Contrary to many a crusty sailor, there are, however, at least three ropes on a boat. This piece of trivia can be used to win libations at the local marina bars.
- The Bell Rope: The small rope attached to the ball on a bell.
- The Bolt Rope: The sewn-in rope at the leading edge of a sail to hold it in its track.
- The Bucket Rope: About 6 ft (2m) long attached to a bucket used for deck washdown.
Caution: After you are underway, use of the bucket rope may require the use of a Man Overboard throw line.
Knots
The art of using lines (rope) to perform many sailing tasks often requires tying knots. Many of these knots are clever indeed and have a long rich history. Sheet bend knots dating back to 7,000 BC have been found in Finnish fishing nets.
Learning to tie knots is both fun and challenging. The bowline, which is a loop that will not close, is well known, but many other knots are equally important; e.g. the half hitches, sheet bend, splices, and figure eight. Some knots tend to be purely decorative, while others may be essential for survival.
The website Animated Knots is by far the best source reference for learning to tie knots. The knots are shown in an animated format so you can easily learn the progression. They also have iPhone, iPad, and Android apps that you can use to take with you on a sailing trip and make challenges for the kids (adult kids too).
Below are the knots you need to at least know. By clicking on the image you will be taken to the animated knots-specific knot page.
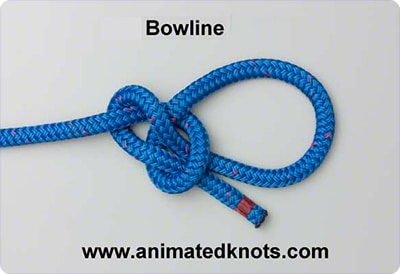
Bowline
A bowline is typically used to tie the jib sheets to the clew of the jib sail.
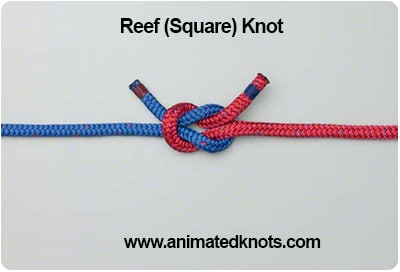
Reef or Square Knot
The reef knot also known as the square knot is mainly used when reefing the sail. This knot is not very secure and it can easily slip undone.
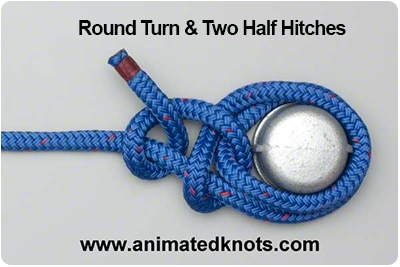
Round Turn and Two-Half Hitches
A round turn and 2 half hitches is typically used to tie to a pylon.
Rolling Hitch
A rolling hitch is used when you need a knot that won’t slip when pulled at an angle. This knot is ideal for taking strain off another rope.

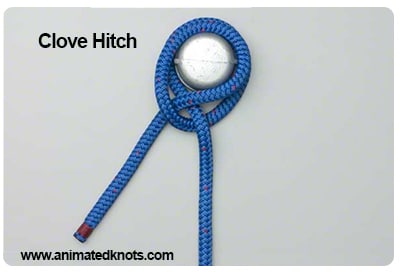
Clove Hitch
The clove hitch is quick to tie and easy to adjust; it is ideal for securing fenders (and horses).
Cleat Hitch
The cleat hitch is used to make fast to a cleat
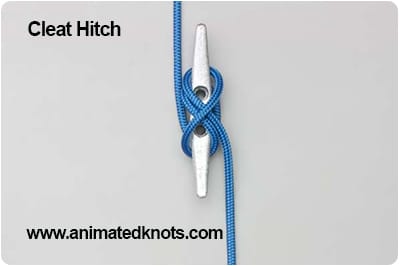
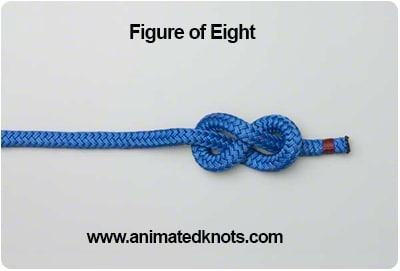
Figure Eight
The figure eight knot is easy to tie and stops the rope from escaping through a jammer, block, or pad eye. It is also very easy to undo when needed.
You can learn more in the Skipper Course....
Knowledge and theory for longer distances and overnight sailing in diverse conditions. The Skipper Course is a comprehensive online sailing course for beginner to intermediate sailors wanting to learn how to sail larger sailboats 26ft to 56ft. Or upgrade to the Skipper Course Bundle of online courses to also master maneuvering under power and docking!