This article is an excerpt from NauticEd’s online Skipper Large Keelboats Course, a comprehensive online sailing course for beginner to intermediate sailors to learn how to sail large sailboats 26 ft (8m) and above. The Skipper Large Keelboats course is part of the Skipper Course Bundle of online courses, also teaching you how to master maneuvering under power and docking!
You can learn to sail and improve your sailing with NauticEd, the international leader in sailing education.
Anchoring
Anchoring in the Right Spot
Anchoring is not simply throwing a “hook” and letting out a line. However, after watching some sailors, this seems to be their theory. Successful anchoring requires a plan considering all the factors.
Be Aware of These Things
The biggest failures to safely anchor and properly hold an anchor are a lack of attention to wind and tides and poor “setting” of the anchor in the first place.
- Shelter from wind, swell, and waves.
- Out of the way of traffic.
- Out of the way of other anchored vessels.
- Sufficient depth of water around the entire 360-degree swing of the vessel if wind direction changes.
- No dangerous rocks in the 360-degree swing area.
- Rising and falling tide.
- Changing current caused by tidal flow.
- Bottom conditions (good or poor holding ability compared to type of anchor).
- Prohibited areas.
- Cables and lines across the bottom. These almost always exist in a marina. But also check the charts for subsurface electric and telephone lines to an island or peninsula.
- Scope.
- The makeup of your anchor line “rode.” (All chain or chain/rope(line) combination?)
Wind
Expect the wind direction and velocity to change. Use wind prediction apps to gain insight into what may happen to the wind during the night. In tight bays and bays with high cliffs, the wind swirls and constantly changes direction.
Tide
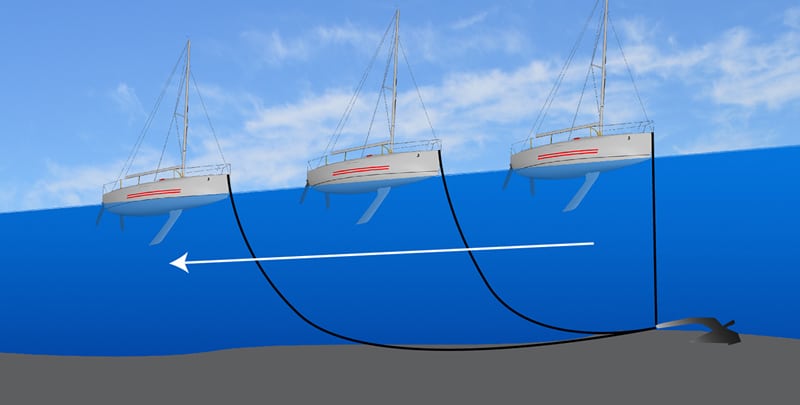
The tide goes up and the tide goes down. A rising tide will reduce your scope and will reduce the ability for the rode to lie horizontally across the bottom. View the below animation.
Tide Animation
An ebbing tide will increase your swing and scope because the depth is reduced. This puts you closer to shore or can land you on the bottom or rocks, or all three.
As the tide ebbs and flows so will the tidal current direction. This can swing you closer to hazards.
Setting the Anchor
Once you select a spot and consider as many of the above factors as possible it is time to make crew assignments and discuss hand signals between the bow and the helm. Both the bowperson and the helmsperson must know what is required and be able to communicate to anchor properly. The bow person must know how much rode to deploy based on the scope discussion below and be able to count the length of rode going out.
In the Communications chapter, hand signals were discussed. The skipper and the anchorperson are advised to learn these prior to anchoring and mooring operations. You can establish others as needed.
Here is how an anchoring maneuver is supposed to go in a perfect world:
- Motor the boat into the wind.
- Stop the boat in the water at the desired location.
- Deploy the anchor over the bow.
- The bow person communicates to the helmsperson that the anchor is nearing the bottom
- The helmsperson begins to motor the boat in reverse.
- As the anchor touches the bottom the boat should be moving slowly backward so the rode lies in a straight line across the bottom. It is important not to pile the rode on top of itself.
- When the appropriate amount of rode is released, it is made fast.
- The boat’s momentum will tug on the anchor and set the anchor into the bottom.
- Additional pressure can be applied to the anchor by applying more reverse power: about 1500 rpm is sufficient
- If possible, swim to the anchor to check it is set.
If you are lucky it will set the first time; otherwise you need to keep trying.
Setting the Anchor
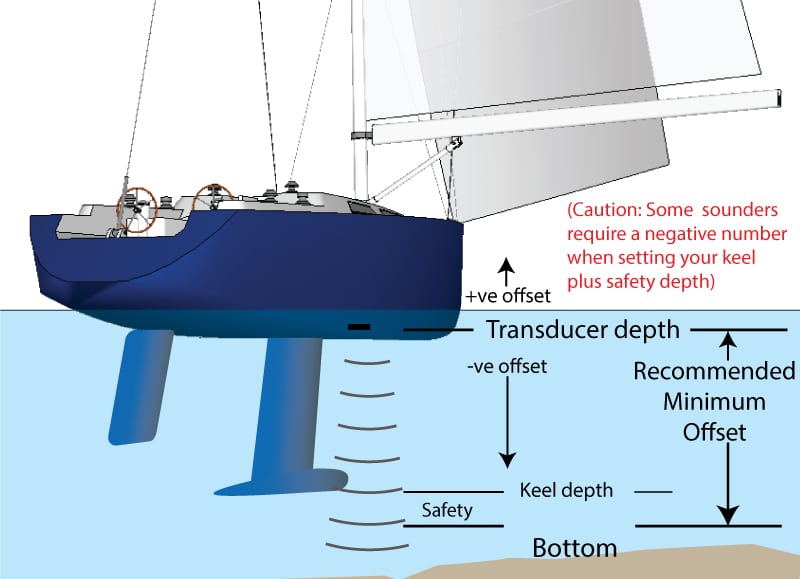
Offset
Offset is the preset distance programmed into the depth sounder to allow for the keel depth + some safety. For example, if the offset was set at zero, then your keel would hit bottom when the depth sound showed about 5 feet remaining (because of the depth of the keel) – that’s annoying! Rather then, an offset is programmed into the depth sounder to allow for the keel depth plus a few feet of safety. Now if the water depth reads zero on the meter, then you must take evasive action as you are very close to hitting bottom. Actually, evasive action should be taken prior to getting anywhere close to zero.
Anchoring Example
For this example, (this is an example only), consider anchoring in 15 feet of indicated water depth. To anchor in other depths, you will need to make appropriate accommodations and adjustments.
Step One: As you approach the selected anchorage put the bow of the boat into the wind and prepare to drop the anchor at the predetermined spot.
Step Two: When the desired spot is reached, the helmsperson and foredeck (person dropping the anchor) must work together and communicate. The helmsperson stops the boat and signals to the foredeck the water depth and begins to lower the anchor. As the anchor rode begins to pay out, the foredeck person signals to the helmsperson to begin backing the boat slowly. This ensures that the rode is laid out along the bottom and not piled on top of itself.
Step Three: As the boat moves backward, the foredeck person pays out the correct amount of rode using length markers on the rode and according to the water depth. In this example, we are using 15 feet of indicated water depth plus (usually about) 7 feet of offset. plus 3 feet from the water surface to the bow of the boat, a total of 25 feet. For all chain, the amount of rode would be 2 x 25 plus 50 = 100 ft. For chain plus rode the amount of rode would be 4 x 25 plus 50 = 150 ft.
Step Four: When the correct amount of rode is paid out, the foredeck signals such to the helm.
Step Five: The helm will disengage the gear and allow the boat momentum to carry the boat backward. When the rode becomes taught the foredeck signals such to the helm.
Step Six: Setting the anchor happens when it digs into the sea bottom. When the anchor is set, the boat will stop moving back. The helmsperson applies about 1/2 throttle to give the anchor a “good set”.
Step Seven: The amount of rode that may be paid out can be adjusted as determined by conditions. Conditions are wind, current, room in the anchorage, and whether the crew will remain on the vessel. For example with light winds in a tight anchorage where the crew remains on board, less rode might be used.
How much rode? Remember, you can use this Rule of Thumb.
- All chain – use 50 ft (15m) plus 2 times the depth.
- For line and chain use 50 ft (15m) plus 4 times the depth.
You’ll now realize that the deeper the water the larger the diameter circle for your boat to swing around which is sometimes not desirable.
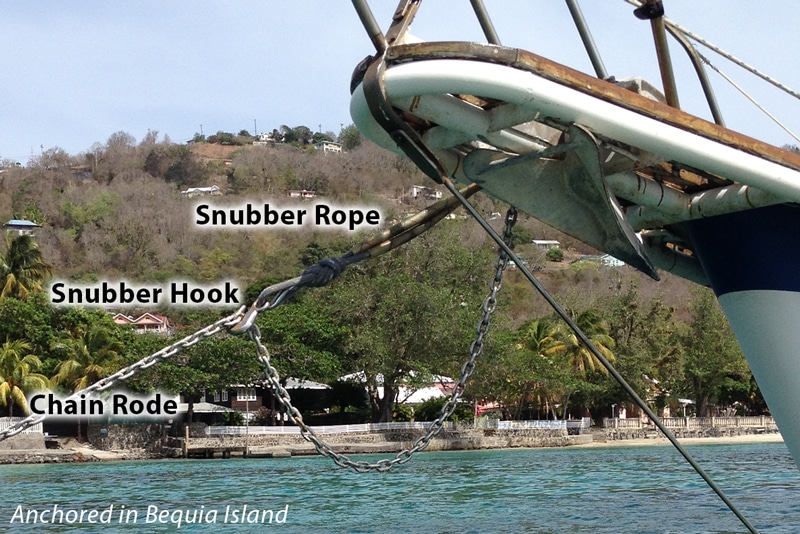
Using a Snubber
Once anchored, for an all chain rode, it is recommended to relieve the direct connection of the chain to the boat by adding a length of stretchy rope called a snubber alongside the chain for 2 to 3 meters. The snubber provides the rode system with elasticity and is most commonly hooked (or tied) to the chain and then tied off to a cleat on the boat. The chain is then let farther out to relieve its tension. The snubber will absorb the impact of any wave action and remove the load off the windlass, which could possibly slip.
Of note, the shallower the depth, the more essential it becomes that you need to use a snubber. This is because at shallow depths the chain is less curved from the catenary and is pulling on the anchor in a straighter line from the anchor to the bow. Thus the curved catenary can absorb less shock. At deeper depths the shock is absorbed by lifting the anchor chain off the bottom – and so a snubber is not essential.
To be effective, the snubber should be as long as possible—the longer the rope the greater the energy absorption.
A Snubber Helps Absorb Wave Shock
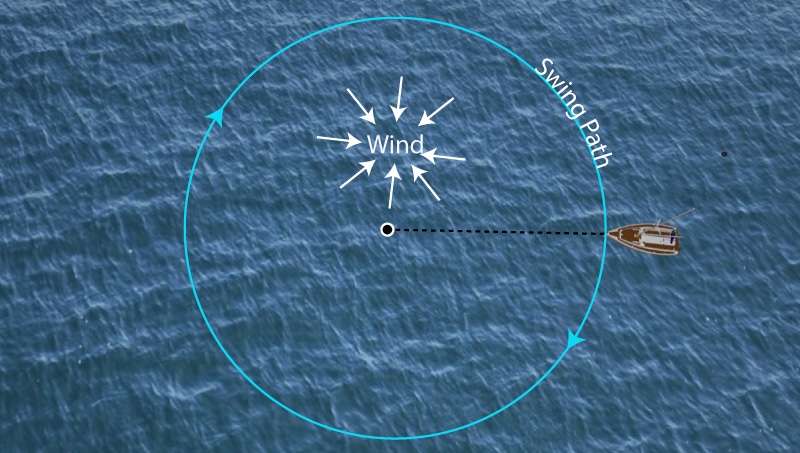
Swing
Your boat position is always downwind from the anchor. When the wind changes direction your boat position changes. This change in position is called swing.
Swing should always be considered when anchoring, especially if anchoring overnight or leaving the boat alone. A change in wind can put your boat into a precarious situation by being too close to the shore or a rock or reef that was previously clear. As long as you don’t anchor too close to other anchored boats, there is usually not a problem because those boats will also swing with the wind change.
Swing
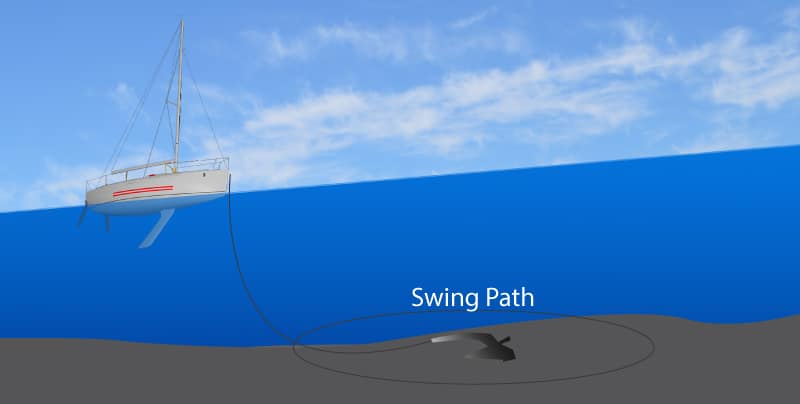
Many times you’ll find an area with mooring balls. These moorings are tied straight down to the sea floor and thus boats tied to moorings swing less than anchored boats. Therefore, it is generally a very bad idea to anchor in a mooring field. The golden rule is always “consider your swing.” Consideration must be given to the tide. As the tide “ebbs” out, you not only get closer to the bottom but your swing circle grows and the shore becomes closer. The below diagram shows a boat’s swing path with deep water and the correct scope.
Swing
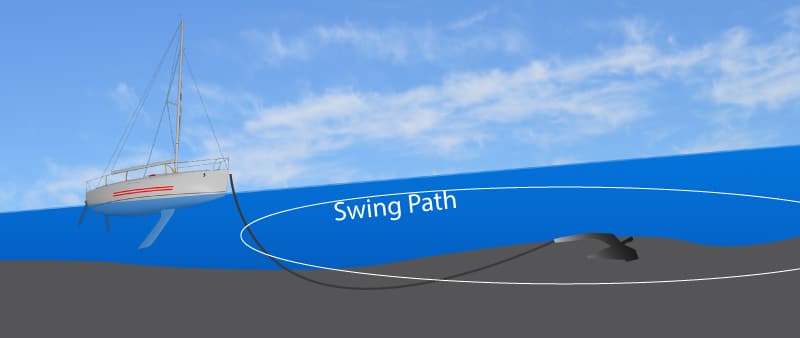
The below diagram shows that as the tide ebbed out, the scope increased as well as the swing path, bringing the boat dangerously close to the bottom, the shore, or both.
Swing
Monitoring
After the anchor has set and adequate rode has been paid out, take time to ensure you are not drifting. Considering changing winds, tide height, and tidal current – it is important to periodically monitor how well your anchor is set.
Check your anchor set manually and electronically. Manually, sight bearings to objects on shore and determine that they are constant. Note that the boat will swing back and forth with the wind, making it a little difficult to check that you are remaining steadfastly connected to the bottom. But, over time, you will get a feeling that through each successive swing, bearings to objects on the shore are not changing.
Electronically you will have a more accurate determination. If you have a GPS device, turn it on and turn on “show track.” Observe over time the history track of your boat. If the tracks overlay each other then you are holding steadfast. You can also use an anchor alarm on your depth meter. To do this, you set the maximum and minimum allowable depths. If the depth goes out of this range, the alarm sounds. There are also apps for your mobile device. NauticEd has invented one whereby you draw a safe shape around your boat on your phone with your finger. If the boat goes outside this shape, the alarm sounds.
- NauticEd Tracklink App and Anchor Zone App – the video below is a repeat from the last section – but anchor alarms are important.
Lights at Anchor
The International Rules of Prevention of Collision at Sea govern the lighting requirements for anchoring. These are described in Chapter 5. Not only must you know your own vessel’s lighting requirements, but you must know others to be able to identify them. We recommend that you revisit the rules often. Visit our Sailing Apps page to download the free NauticEd app. You can then review all the NauticEd Courses offline while you sit in the doctor’s office or are stuck on an airplane.
A sailboat at anchor must have one all-around (visible from 360 degrees) white light at the top of the mast. You may NOT leave on your green and red side lights or your white stern lights “for extra visibility.” Those are running lights and indicate that you are NOT at anchor. A good idea, however, is to leave on a cabin light; but consider your batteries.
A further life-saving idea is to always have a powerful flashlight available within quick reach in the dark.
You can learn more in the Skipper Course....
Knowledge and theory for longer distances and overnight sailing in diverse conditions. The Skipper Course is a comprehensive online sailing course for beginner to intermediate sailors wanting to learn how to sail larger sailboats 26ft to 56ft. Or upgrade to the Skipper Course Bundle of online courses to also master maneuvering under power and docking!